

Microsoft Paint isn't actually so bad. It comes free with Windows (so almost everybody has it), it has basic functions like resizing and flipping, can zoom in and out, has full-color support, can undo/redo, and these days can save in various formats (like PNG for Dungeon Craft) besides BMP. It also uses very little processing power, which is also a very good thing.
Another useful characteristic of Microsoft Paint is that it assigns a different color to both the left and right mouse buttons—convenient for detailed pixel-placing.
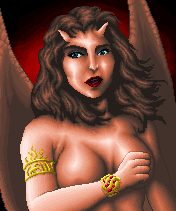
As an example, below is the process that was used to draw Glasya, the Princess of Hell:
 |
 |
 |
 |
 |
 |
 |
 |
 |
| Black & White Sketch | Rough Coloring Added | Coloring Smoothed | More Smoothing, Palette Changed | Background and Jewelry Added |
Technique #1: Line Palettes
In some of the images, there is a strange little line of colors sitting in some of the white space left over. Because MS Paint lacks an automatic method of shading colors, we have to do this manually, but it helps a lot to have a "palette" sitting around from which to grab colors from. By giving it a characteristic shape, we can also more easily remember which color we were using so that we can quickly select the subsequent grade of color to shade with next. It also helps to save palettes that you use often so that you don't have to spend time generating them again later on. (Sometimes it also helps to write their numbers adjacent to them, since MS Paint has no way to access them again—unless you have a very good eye.)
Technique #2: Transparent Pasting for Pseudo-Layers
This is fairly obvious, but MS Paint has the ability to paste image data while keeping one color transparent (the right-click color), as long as you make sure that you click the transparency option near the bottom of your tools. This helps us to deal with the fact that MS Paint does not support layers; in Glasya's case, I drew her jewelry separately first, and then simply copied and pasted them onto her later.
Technique #3: Palette Swapping
MS Paint lacks a way to change the palette of an image (say, make Glasya less ochre and more pinkish), but there is a manual way of getting around this, as long as the number of colors you want to change is not ridiculously large. First, you should create two palettes - one of the existing colors of your image and another of the colors that you want to replace them with. Once you do that, you can select an old color with the dropper by right-clicking, and then a color you want to replace it with the dropper by left-clicking. Next, you select the entire image (Ctrl+A) and then cut the entire image (Ctrl+X). Now, fill the entire space with the bucket by left-clicking, and then finally paste the clipboard's contents to the painting area (Ctrl+P) (make sure that you click the transparency option that you see near the bottom of your tools). Do this for ALL of your palette colors that you want to replace (juxtaposing the two palettes together makes this process a bit easier, so that you can keep track of what you are doing).
For an example of a large icon, a gold dragon is shown below. This picture was much harder to draw than Glasya, so I began this one by sketching out a very rough picture first. (With icons, we also have to make sure that it animates fine, so it helps to draw roughs to confirm this.)


Technique #4: Instant Animation
For icons, you can test animation by simply copying the whole right side of the image, and then pasting it (it automatically gets pasted to the left side). Instant animation! You can also undo (Ctrl-Z) and redo (Ctrl-Y) to quickly check your animation again. Of course, you should make sure that you are copying the right coordinates - the little dots around the canvas (marking the centers) help a little.
How Long Does This Take?
Obviously, the biggest problem with drawing in Microsoft Paint is that it often takes a LONG time to finish a picture. Basically, to do a well-done picture, you must manually place every single pixel onto your image canvas—this obviously takes a long time. The gold dragon above was actually quicker to finish than other dragons that I have done, only taking about a week to finish. Glasya above only took about 2 days to do, but the design was fairly simple (not many colors, not many different items).